

Tutorial
Brief: This tutorial shows how to dual boot Linux Mint with Windows 10 and enjoy both Linux and Windows together in one system.
So you've decided to switch to Linux. Good decision! If you chose Linux Mint, that's an even better decision.
Linux Mint is one of the best Linux distributions for beginners. Using
Linux Mint is fairly easy and installing Linux Mint is no rocket science
either. In this tutorial, we’ll see how to install Linux Mint along side
Windows 10.
There are a few different ways you can use any Linux based operating system.
- Use Linux inside Windows in a virtual machine: This runs a Linux OS like any other application within Windows. This is also one of the safest ways to get a feel of Linux. However, this will utilize your system resources and if you have less than 4Gb of RAM, I wouldn’t advise using it extensively.
Use a live version of Linux: In this method, you put Linux on a USB or DVD and you boot from it. This is usually slow and your changes done to the Linux system are (normally) not saved. This is particularly useful if you just want to see what Linux feels like.
Remove Windows and using only Linux: If you have backed up your data and have a recovery or installation disk of Windows ready with you or if you are determined that you are not going back to Windows, you can remove Windows completely and use only Linux.
Install Linux alongside Windows: This method is called dual booting
Linux with Windows. Here, you install Linux on a system that already has
Windows. And when your system powers up, you can choose if you want to use
Windows or Linux. This involves touching the disk partition and sometimes
boot order. Absolute beginners often find it complicated but this is the
best way to use Linux and Windows together in one system. And in this
article, we’ll see how to dual boot Linux Mint with Windows 10.
 |
| Dual Boot allows
you to select using Windows or Linux at the Boot screen |
Will dual booting Linux with Windows slow
down your system?
I am asked this question all the time. The
short answer is no. Dual booting operating systems won't slow down your
system in any way.
The only delay is a 10 second buffer giving
you time to select the operating system you want to use. After that 10
seconds the BIOS will select the operating system first on the list.

- Back up your data: Installing a dual boot system is rather straightforward but you will be dealing with system partitions here so backing up your files to a USB or other external media is the smart way to go, just in case you overwrite the wrong partition.
- Have a boot repair disk on hand: If your installation gets messed up you can repair the Windows part with a boot repair disk. You can create a boot repair disk on an extra USB or CD or repair from the original Windows install disk with the install key.
Reminder: This tutorial applies to computers that have
Windows 10 already installed on the system because it doesn't work the
other way around. Linux will reside anywhere on the hard disk you want it,
Windows doesn't have that option so Windows has to be the first
installation.
Now that initial precautions have been met, let's get started.
Step 1: Create a live USB or CD
Go to the Linux Mint website and download the ISO file. This ISO file
is the disk image you will make the live USB or DVD with.
There are several Desktop Environments to choose from. The default is
Cinnamon but there is also MATE and Xfce. Cinnamon is the best one to
transition from Windows to Linux as it operates close to the way Windows
does. I encourage you to explore your options.
Once you have downloaded the Linux Mint ISO you'll need a tool to write
the image to a disk. I recommend BelanaEtcher. It is a cross platform tool
used to flash operating systems to portable storage devices like USBs,
CDs/DVDs and SD cards.
Using BelanaEtcher is very easy. Just
select the ISO, select the medium you want to flash (USB or DVD), then
Flash.

Step 2: Make a new partition for Linux
Mint to live in.
Now that you have all the tools you need
and have backed up the Windows files you can't replace, it's time to
begin preparing the drive partitions. This is where you have to be
cautious. If you have multiple partitions (not the recovery ones), you
can either use one of them or create a new partition from an existing
partition. Your existing data will be safe if you have enough free
space. Typically, you install Linux in under 10 Gb, however, if disk
space if not a concern, I advise using 30-40Gb at least. This way you
can have more space at your disposal for downloading and keeping various
files.
In Windows 10, go to start menu and type
‘partition’. This will bring up Disk Management utility. Now carefully
select the disk in which you’ll make some free space by shrinking the
volume:
I recommend watching this video for the
exact steps you need.
Step 3: Boot in to live USB
Plug the live USB or disk into the computer
and restart the computer. While booting the computer press F2, F10,
F12 or Del function key (depending on your computer manufacturer)
to go to the boot menu in your BIOS. Now, choose the option to boot from
USB or Removable Media.
Important Note: If your
computer came with Windows 8 or Windows 8.1 and you upgraded your system
to Windows 10, you may have to disable secure boot. Most modern systems
with Windows 10 should not need this step, especially with Linux Mint or
Ubuntu.
Step 4: Start the
installation
It takes some time to boot from the live
USB or disk. Have some patience. Once it boots in to live disk, you’ll
be prompted to Try Linux Mint or Install Linux Mint. Even if you choose
to try it, you can find the install option on the desktop:

In next few screens, you’ll be asked to
choose the language of the operating system. It will then do some checks
on available space, battery (if it's a laptop) and Internet connection.


Step 5: Prepare the partition
This is the most important part of the installation. Where to install
Linux Mint
If you see the option to install Linux
Mint alongside Windows, you can select that. Linux Mint will
handle things on its own. If you do that then skip steps 5 and 6.
As mentioned before, I prefer to separate the partitions for Windows
and Linux. Windows is already installed here, we'll prepare a new
partition for Linux Mint. In the Installation Type window
chose Something else:

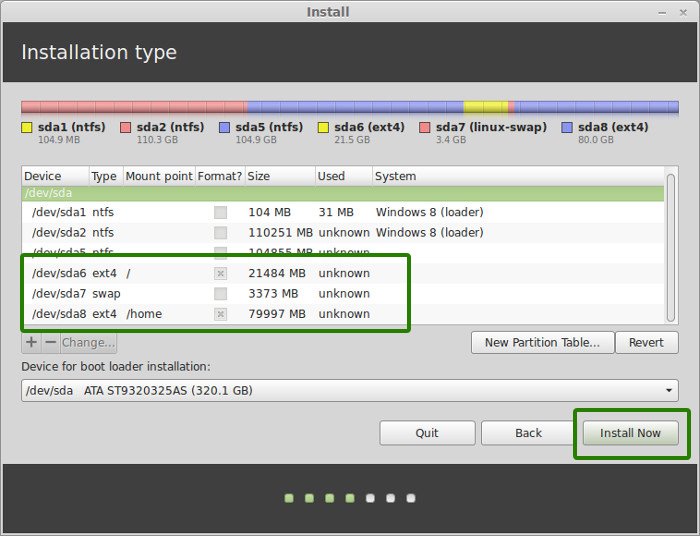
Step 6: Create root, swap and home
Since you already created a new partition in Windows, it's time to
install Linux Mint on it. There are several ways to do it but here I'll
show you the easiest way and that is to have a Root, swap and a Home.
Create a Root partition first. Choose the free space available and
click on +.
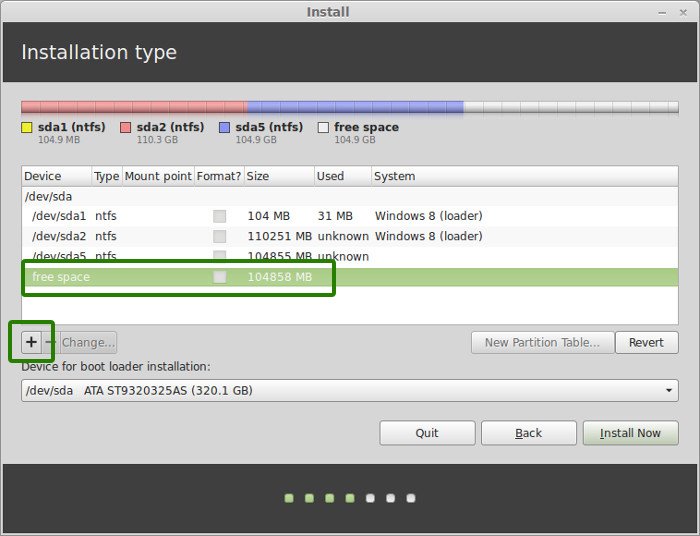
If you have total 100 GB at disposal, give 30 GB to root. In any case,
don’t give it less than 15 GB because if root runs out of space, your
system will slow down and you’ll run into issues.
I opted to have 20 GB, choose ext4 file system, and mount point as /
(i.e. root):


The next step is to create Home. Try to allocate the maximum size to Home
because this is where you'll be downloading and keeping the files.
Basically all your applications and everything you save with those
applications.

Next is to create the swap partition. The question is, what should
the swap size be for Linux Mint installation.
The answer depends on your RAM (Random Access Memory) size, your
needs (how much RAM you use), available disk space on the hard drive and
whether you would use hibernation or not.
The chart below will help you with your decision.

Don’t spend too much time thinking about
swap. It is helpful for systems with less memory. For system with more
than 8 GB of RAM and SSD, the less the swap, the better it is.
Newer versions of Linux Mint utilize Swap
file. It creates a special file under root and utilizes it as swap area.
You can have both swap partition and swap file in a system.


Once you have created the partitions click Install Now
Step 7: Follow the trivial instructions
If you've reached this point with no issues then you've jumped the
biggest hurdle. Now you'll go though a number of screens to select your
personal options like keyboard layout, and login credentials. No genius
level work here but I have still included screenshots just in case.


This part is kind of important. Time to choose a login and
password.


No need to be really creative with the name
of the computer but the password needs to be a good one. Remember that
you'll be using your password a lot in Linux Mint when
installing/removing applications.


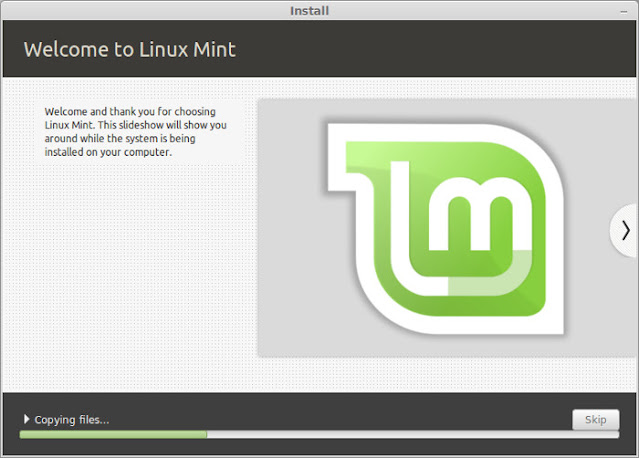
Once the installation is done you'll be
asked if you want to keep testing the Live version or Restart the
system.

And that would be it. On next boot, you
will see the option of Linux Mint on the grub screen. And thus you can
enjoy the beautiful and beginner-friendly Linux distribution. I hope you
found this guide to Linux Mint dual boot with Windows helpful.
I strongly advise you to read the Welcome
screen after installing Linux Mint so that you can have a good
start.
No comments:
Post a Comment